

Views: 0 Author: Site Editor Publish Time: 2025-07-27 Origin: Site


To measure for kitchen sinks, start by identifying the sink type you want. Measure your cabinet and the cutout area carefully. Adjust your measurements for the installation style, such as top-mount or undermount. Accurate measurement matters most. Many people make mistakes by measuring the sink or countertop space incorrectly. Always use a measuring tape and a level for the best results.
Double-check every dimension, including width, depth, and height. This extra step helps prevent problems during installation and ensures your new kitchen sinks fit perfectly. Anyone can learn how to measure a kitchen sink with the right approach.
Use a tape measure and level to get accurate measurements of your cabinet, countertop cutout, and sink dimensions.
Measure cabinet width, depth, and height carefully to ensure your new sink fits without interfering with plumbing or storage.
Check the sink cutout size on your countertop and compare it with the sink’s dimensions, especially for different installation types like top-mount or undermount.
Choose the right sink style and material based on your kitchen layout, design preferences, and how you plan to use the sink.
Double-check all measurements twice and record them clearly to avoid costly mistakes during installation.
Consider special sinks like farmhouse or corner sinks carefully, as they may require cabinet modifications and precise measuring.
Use manufacturer templates and instructions to guide your measurements and installation for the best fit and finish.
Follow a final checklist before installation to ensure all tools, measurements, and preparations are complete for a smooth sink replacement.

Before you start measuring for a kitchen sink, gather the right tools. Using the correct equipment helps you get accurate results and makes the process easier. Here are the essential tools you need:
Tape measure: This tool gives you precise measurements of your cabinet, countertop, and sink cutout. Choose a sturdy tape measure that locks in place.
Level: A level checks if your surfaces are even. This step prevents problems during installation and ensures your sink sits flat.
Pencil and paper: Mark your measurements directly on the cabinet or countertop. Write down every number on paper so you do not forget or mix up dimensions.
Straight edge: Use a straight edge to check for flatness and to help draw straight lines when marking cutouts.
Grid paper: Drawing your measurements on grid paper helps you visualize the space and double-check your work.
Tip: Laser measuring tools and laser levels can make the job even easier. They measure to fractions of an inch and work well for tricky angles or when you work alone.
Some tools are not required but can improve your accuracy and make the job smoother. Consider these optional tools if you want extra precision:
Laser distance measurer: This tool gives extremely accurate readings, especially for long or awkward spaces. It is helpful if you want to measure alone.
Laser level: A laser level projects a straight line across your work area. This feature helps you check for evenness and alignment.
Measuring at multiple points: Use your tape measure to check several spots along the cabinet and cutout. This step helps you find any irregular shapes or uneven edges.
Marking and recording: Always mark your measurements with a pencil and record them on paper. This habit helps you avoid mistakes and makes it easy to double-check your numbers.
These optional tools and habits help you get precise, repeatable, and verifiable measurements. They also make it easier to spot errors before you start cutting or installing.
Measuring for a kitchen sink may seem simple, but safety matters. Follow these tips to protect yourself and your kitchen:
Clear the area before you start. Remove any items from the countertop and under the sink.
Use a sturdy step stool if you need to reach high or deep spaces.
Keep your fingers away from sharp edges on old sinks or countertops.
Always handle tools, especially tape measures and straight edges, with care.
Wear safety glasses if you plan to mark or cut near your face.
Note: Double-check your measurements before making any cuts. Taking a few extra minutes now can save you from costly mistakes later.
When you choose kitchen sinks, you need to know the different materials available. Each material has its own strengths and affects how you measure and install your sink. Here is a quick look at the most common materials and their market shares:
| Material | Market Share (%) | Key Attributes |
|---|---|---|
| Stainless Steel | 45 - 51 | Durable, easy to clean, resists stains and corrosion |
| Ceramic | ~30 | Classic look, stain resistant, easy to maintain |
| Artificial Stone | ~15 | Luxurious, strong, modern appearance |
| Others (Composite, Glass) | ~10 | Unique designs, lightweight, colorful options |

Stainless steel leads the market for kitchen sinks because it is tough and easy to care for. Ceramic sinks give your kitchen a timeless style. Artificial stone and composite sinks offer a modern look and come in many colors. The material you pick can affect how you measure. For example, fireclay and ceramic sinks may have small size differences from the factory, so you need to double-check your measurements. Stainless steel sinks usually have more precise sizes, making them easier to fit.
Tip: Always check the manufacturer’s specs for kitchen sink sizes, especially if you choose a material like fireclay or composite.
You will find many styles when shopping for kitchen sinks. Each style fits different needs and kitchen layouts. Here is a table to help you compare the most popular options:
| Sink Style | Key Features & Pros | Best For |
|---|---|---|
| Farmhouse (Apron-Front) | Deep, wide basin, strong visual impact | Rustic or traditional kitchens |
| Undermount | Sleek, seamless, easy to clean | Modern kitchens |
| Drop-In (Top-Mount) | Simple to install, fits most countertops | Budget remodels, rentals |
| Double-Bowl | Two compartments for multitasking | Large families, frequent cooks |
| Single-Bowl | Fits large pans, easy to clean | Bakers, home chefs |
| Bar or Prep Sink | Compact, adds prep space | Large kitchens, islands |

Single-bowl sinks are gaining popularity because they handle large pots and pans. Double-bowl sinks help you multitask, such as washing and rinsing at the same time. Farmhouse sinks stand out as a design feature and offer a deep basin. You can also add a bar or prep sink for extra workspace.
How you install your kitchen sink affects both the look and the measuring process. Here are the main installation types:
Drop-In (Top-Mount) Sinks: You place these sinks into a hole in the countertop. The rim sits on top. You need to measure the cutout carefully so the sink fits snugly.
Undermount Sinks: You attach these sinks below the countertop. This style gives a smooth look and makes cleaning easy. You must measure the inside of the cabinet and the thickness of the countertop.
Flush-Mount Sinks: The sink edge sits level with the countertop. This type needs very precise measuring and installation.
Corner Sinks: You install these in the corner of your countertop. They save space and work well in small kitchens.
Note: Always measure the cabinet and cutout space before you buy a new sink. Different installation types and materials can change the required kitchen sink sizes.
You now have a clear overview of the main materials, styles, and installation types for kitchen sinks. This knowledge will help you choose the right sink and measure accurately for your kitchen project.

Start by measuring the depth of your cabinet. This step ensures your new sink will fit without interfering with plumbing or storage. Most modern kitchen sink cabinets have a standard depth of 24 inches. This size gives you enough space for plumbing and under-sink storage. However, always check your own cabinet because custom kitchens may have different measurements.
To measure cabinet depth:
Open the cabinet doors below your sink.
Place your tape measure at the back wall of the cabinet.
Pull the tape straight to the front edge of the cabinet frame.
Write down the measurement in inches.
Tip: Measure at both the left and right sides. Sometimes, walls or pipes can make one side slightly shorter.
If you plan to install a deeper sink, make sure the depth does not interfere with the plumbing or reduce storage space too much. Double-check the available space before choosing a deep basin. This step helps you avoid problems during installation.
Next, measure the width of your cabinet. This measurement is critical for selecting a sink that fits well. Most kitchen sink cabinets range from 24 to 36 inches wide. The most common size is 36 inches, which usually gives you about 34.5 inches of interior space after accounting for the cabinet walls.
Follow these steps to measure cabinet width:
Remove any items from inside the cabinet.
Use your tape measure to find the distance from the left inside wall to the right inside wall.
Record the measurement.
Note: Always measure the interior width, not the outside. Cabinet walls are usually about 3/4 inch thick, so the interior is narrower than the exterior.
Choose a sink that is slightly smaller than your cabinet width. For example, a 33-inch sink fits well in a 36-inch cabinet. This buffer allows for mounting hardware and prevents the sink from rubbing against the cabinet sides. Avoid forcing a larger sink into a small cabinet, as this can damage the structure and void warranties.
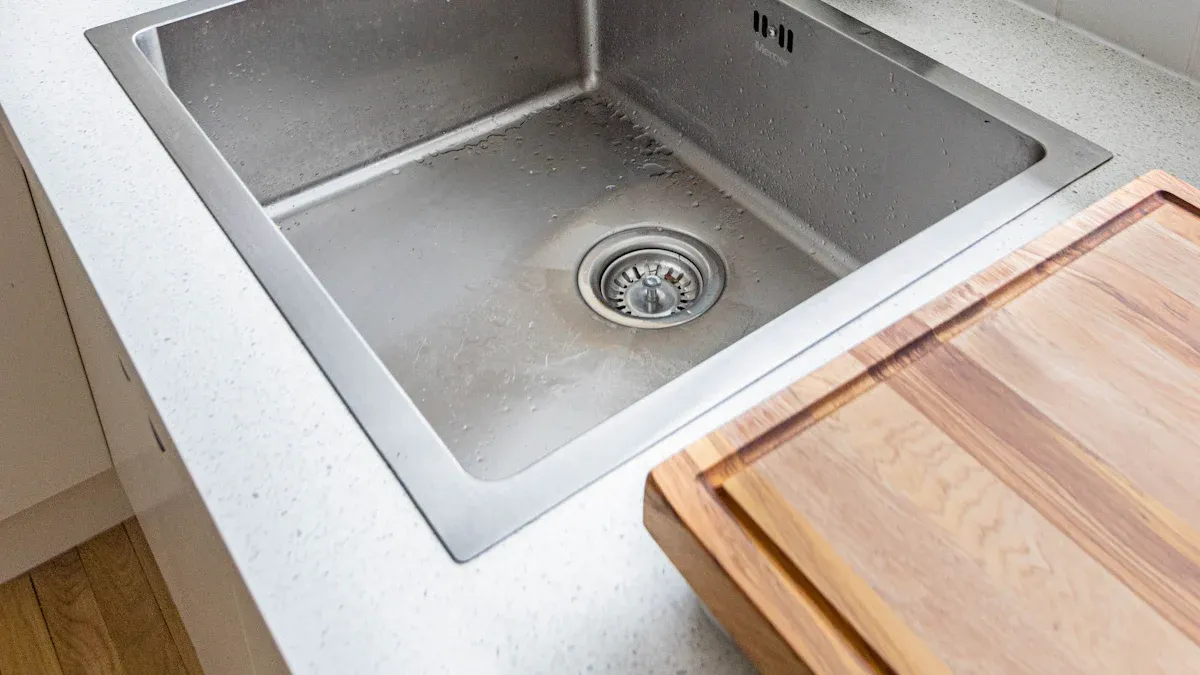
Now, measure the countertop hole, also called the sink cutout. This step is essential whether you are replacing an old sink or installing a new one. Accurate kitchen sink measurements here ensure your new sink fits perfectly.
To measure the cutout:
Remove the old sink if possible. If not, measure from underneath or use the sink rim as a guide.
Measure the length from left to right at the widest points of the opening.
Measure the width from the back (where the faucet sits) to the front edge.
Write down both measurements.
| Sink Type | Typical Cutout Width (inches) | Typical Cutout Length (inches) | Typical Depth (inches) |
|---|---|---|---|
| Single Bowl | 20–30 | 22 | 8–10 |
| Double Bowl | 30–33 | 22 | 8–10 |
| Undermount | Slightly smaller than sink | Slightly smaller than sink | 8–10 |
| Drop-In | Matches sink size | Matches sink size | 8–10 |
When measuring the countertop hole, always check if the sink dimensions include the rim. For undermount sinks, the cutout should be slightly smaller than the sink itself. For drop-in sinks, the cutout matches the sink size.
If you have a corner sink or a unique layout, measure each side of the cutout and note any angles. Make sure the new sink will not interfere with cabinet doors or drawers. Double-check all kitchen sink measurements before making any cuts or purchases.
Callout: Always measure twice before you buy. Accurate measurements prevent costly mistakes and ensure a smooth installation.
Sink depth plays a big role in how comfortable your kitchen feels. When you measure a kitchen sink for depth, you want to make sure the new sink will fit your cabinet and suit your needs. Most kitchen sinks have a depth between 8 and 10 inches. Some farmhouse or utility sinks can be even deeper.
To measure sink depth, follow these steps:
Place your tape measure at the bottom of the sink basin.
Pull the tape straight up to the top edge of the sink.
Write down the measurement in inches.
If you are measuring the old sink, check the depth at several points. Some sinks have sloped bottoms or rounded corners. Always use the deepest point for your measurement. If you plan on measuring a new sink, look at the product specifications. Manufacturers list the depth in the product details.
Tip: Deeper sinks help prevent water from splashing onto your countertop. However, very deep sinks can make it harder to reach the bottom, especially for shorter people or children.
Think about your daily tasks. If you wash large pots or baking sheets, a deeper sink works better. If you want to save space under the sink for storage or plumbing, choose a shallower model. Always compare the depth of your current sink with the new one before making a final decision.
When you want to replace your kitchen sink, you need to measure a kitchen sink carefully. Start by measuring the old sink. This step helps you find a new sink that fits the existing cutout and cabinet. If you skip this step, you might end up with a sink that does not fit.
Follow these steps for measuring the old sink:
Measure the length from left to right across the top of the sink.
Measure the width from front to back.
Measure the depth from the bottom of the basin to the top edge.
Check the distance from the back edge of the sink to the wall or backsplash. This space is important for faucet installation.
Measure the space under the sink for plumbing and garbage disposal units.
If you cannot remove the old sink, measure from above and below. Use a flashlight to see the edges under the countertop. Write down every measurement. Double-check your numbers before you shop for a new sink.
When measuring a new sink for replacement, compare the new sink’s dimensions to your old sink’s measurements. Make sure the new sink is not larger than the cutout or cabinet. If the new sink is smaller, you may need to adjust the countertop or use a sink with a wider rim.
Note: Always check the manufacturer’s installation guide. Some sinks need extra space for mounting hardware or accessories.
If you have a corner sink, measure each side and the angle. Make sure the new sink will not block cabinet doors or drawers. Leave enough countertop space around the sink for food prep and cleaning.
By following these steps, you can measure a kitchen sink for replacement with confidence. Careful measuring helps you avoid costly mistakes and ensures a smooth installation.
Top-mount sinks, also called drop-in sinks, are the most common and easiest to install. You place the sink into a hole cut in the countertop, and the rim rests on top. When you measure for a kitchen sink of this type, you need to focus on the cutout size and the rim width.
To measure for a top-mount sink:
Measure the length and width of the existing cutout in your countertop.
Check the manufacturer’s template for the recommended hole size. Most top-mount sinks have a rim that covers small gaps, so you do not need to be exact to the millimeter.
Make sure the sink is slightly smaller than the cabinet’s interior width. For example, a 33-inch sink fits well in a 36-inch cabinet.
Consider the rim width. The rim should sit flat and cover the cutout edges completely.
Tip: Top-mount sinks are forgiving if your cutout is not perfect. The rim hides minor imperfections, making this style ideal for DIY projects.
Undermount sinks attach beneath the countertop, creating a seamless look. This installation type requires more precise measurements and a solid surface countertop, such as granite or quartz. You need to pay close attention to sink sizing for undermount sinks.
When measuring for undermount sinks, keep these points in mind:
The sink must fit inside the cabinet, so the length should be less than the cabinet’s interior width.
The countertop cutout must match the sink’s bowl size, not the rim, since the rim attaches underneath.
The rim dimension is critical. Double-check the manufacturer’s specifications before ordering.
The countertop edge must be smooth and even for a secure fit.
Undermount sinks work best with solid, water-resistant countertops. Avoid using them with laminate or tile surfaces.
Proper sealing and support are essential. The sink can become heavy when filled with water and dishes.
Note: Always measure the depth from the countertop to the bottom of the cabinet. Make sure the sink does not interfere with plumbing or storage.
Flush-mount sinks, sometimes called recessed or integrated sinks, sit level with the countertop surface. This style gives your kitchen a sleek, modern look. Measuring for flush-mount sinks requires extra care and precision.
Here is a comparison table to help you understand the differences in measurement and installation:
| Sink Type | Measurement & Cutting Requirements | Installation Notes & Complexity | Additional Considerations |
|---|---|---|---|
| Flush-mount | Requires very precise countertop cuts for a level fit | Complex; professional installation recommended | Grout needed between sink and countertop |
| Top-mount | Hole cut using manufacturer template; less precision needed | Easier; suitable for DIY | Rim can collect debris; visible rim |
| Undermount | Precise edge cut on countertop underside | Professional installation recommended | No rim; sleek look; debris can collect underneath |
For flush-mount sinks, you must measure the countertop opening exactly. Even a small mistake can cause the sink to sit unevenly or leave gaps. Professional installation is often the best choice for this style.
Callout: Always double-check your measurements and consult the manufacturer’s instructions. Precision matters most for flush-mount sinks.
Farmhouse sinks, also called apron-front sinks, create a bold statement in any kitchen. You see the front of the sink exposed, which adds a classic and rustic look. Measuring for a farmhouse sink takes extra care because this style sits differently than other sinks.
Key Steps to Measure for a Farmhouse Sink:
Measure Cabinet Width:
Open your cabinet doors. Use a tape measure to find the inside width from left to right. Most farmhouse sinks need a cabinet at least 36 inches wide. Write down this number.
Check Cabinet Height:
Measure from the top of the cabinet base to the bottom. Farmhouse sinks are deeper than standard sinks. You need enough space for the sink and plumbing.
Measure Cabinet Depth:
Place your tape measure at the back wall and pull it to the front edge. Standard depth is 24 inches. Some farmhouse sinks are extra deep, so double-check this space.
Front Cutout for Apron:
Farmhouse sinks have an exposed front panel called an apron. Measure the height and width of the apron. Mark these measurements on the front of your cabinet. You may need to cut or modify the cabinet to fit the apron.
Sink Bowl Size:
Look at the product specs for the sink bowl’s length, width, and depth. Make sure the bowl fits inside your cabinet without hitting the sides or plumbing.
Tip: Always check the manufacturer’s template. Many farmhouse sinks come with a paper or cardboard template. Use this to mark the exact cutout on your cabinet and countertop.
Table: Typical Farmhouse Sink Measurements
| Measurement | Typical Range (inches) |
|---|---|
| Cabinet Width | 33 – 36+ |
| Cabinet Depth | 24 |
| Apron Height | 8 – 10 |
| Sink Depth | 8 – 10 |
Special Considerations for Corner and Apron-Front Sinks:
For corner farmhouse sinks, measure both sides of the corner. Make sure the sink will not block cabinet doors or drawers.
Check the countertop overhang. The countertop should cover the edges of the sink for a clean look.
Leave enough space behind the sink for the faucet and accessories.
Note: Farmhouse sinks often require you to modify your cabinet. You may need to remove the front panel or reinforce the cabinet base. Always plan for extra support because these sinks can be heavy, especially when filled with water.
Measuring for a farmhouse sink takes time and attention to detail. Double-check every measurement before you buy or cut anything. Careful planning ensures your new sink fits perfectly and looks great in your kitchen.
When you choose a kitchen sink, you need to know the standard kitchen sink dimensions. These measurements help you compare different models and make sure your new sink fits your space. In the United States, most kitchen sink sizes follow a few common standards. You can see the most popular options in the table below:
| Sink Type | Width (inches) | Length (inches) | Depth (inches) |
|---|---|---|---|
| Single bowl | 22 | 24 | 8 |
| Double bowl (equal) | 33 | 22 | 8 |
| Double bowl (offset) | 31 | 20 | 8 |
| Triple bowl | 42 | 20 | 8 |
Most single-bowl sinks range from 20 to 24 inches wide. Double-bowl sinks usually measure between 33 and 48 inches in width. The depth of a standard kitchen sink ranges from 6 to 12 inches. Shallow sinks work well in small kitchens, while deeper sinks suit heavy-duty use.
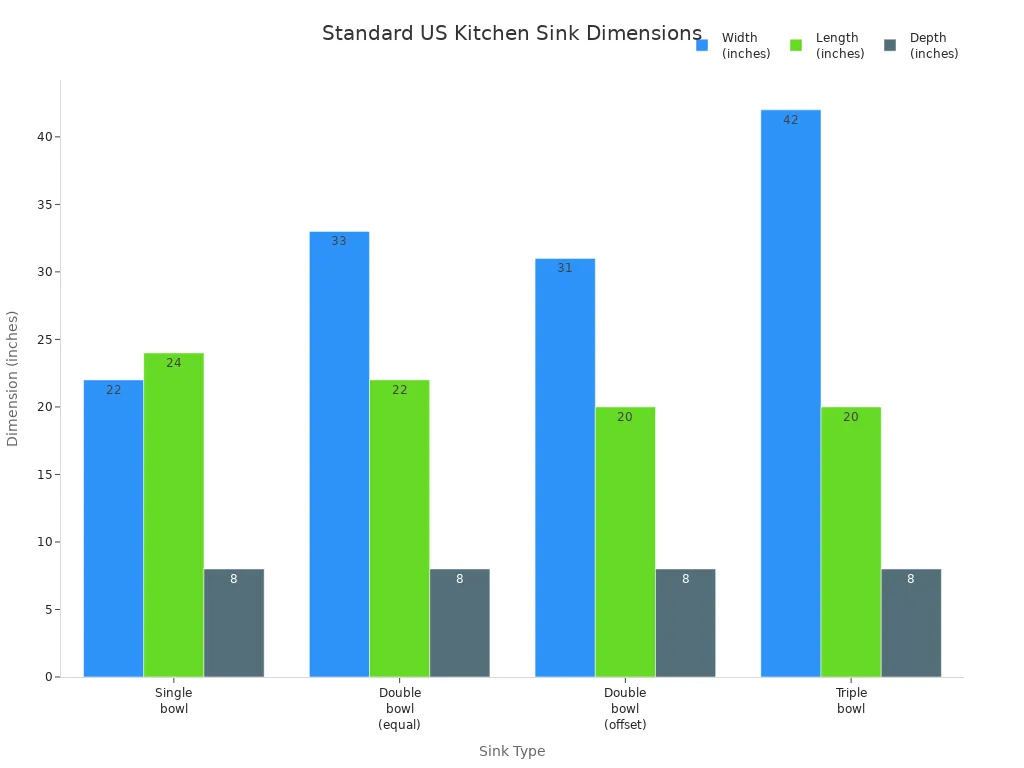
You should always check the product details before you buy. Manufacturers sometimes offer custom kitchen sink sizes, but most homes use these standard options.
The usable basin size tells you how much space you actually get inside the sink. This measurement matters more than the outside size, especially if you wash large pots or bakeware. Different kitchen sink models offer different basin shapes and depths. The table below shows how usable basin size changes with sink width:
| Sink Size Range | Usable Basin Characteristics | Pros | Cons | Best For |
|---|---|---|---|---|
| Under 20" (Bar Sinks) | Very limited usable basin space; mainly secondary sinks | Fits in small corners; good for handwashing or wet bars | Too small for main kitchen use; limited space for dishes; splashing issues | Secondary sinks; wet bars; small spaces |
| 20"-25" (Small Sinks) | Functional but limited design options; usually single basin to maximize space | Good for tight kitchens; fills basin without wasting water; handles most jobs | Limited design options; cramped for double basins; tight for large cookware | Small kitchens; secondary sinks; water-saving needs |
| 25"-30" (Standard Sinks) | Most versatile; options for single or double basins; spacious and comfortable | Wide design variety; roomy yet space-efficient; good for double basins | Requires sufficient counter space; can be large to clean | Main sinks in average to large kitchens; central islands |
| Over 30" (Large Sinks) | Very spacious basins; suitable for multiple simultaneous tasks; can be single or split basins | Accommodates large pots; multitasking; statement piece | Uses more water; harder to clean; heavy materials complicate installation | Large kitchens; home chefs; kitchens with islands or peninsulas |
Deeper basins give you more stacking space but reduce storage under the sink. Single-bowl sinks maximize usable space in smaller kitchens. Double or triple bowls add flexibility for multitasking. Undermount and apron-front sinks often provide more usable basin area because they do not have a rim taking up counter space. Workstation sinks add accessories like cutting boards or racks, which help you use every inch of the basin.
Fitting the correct kitchen sink size depends on your cabinet and countertop measurements. You need to measure the inside width of your base cabinet. Most base cabinets are 24 or 36 inches wide. The sink must be smaller than the cabinet’s interior width to fit properly. For example, a 36-inch cabinet usually fits a 33-inch sink, leaving room for mounting hardware.
| Dimension Type | Typical Measurement | Notes and Considerations |
|---|---|---|
| Base Cabinet Width | Commonly 24" or 36" | Must be measured internally; sink length must be less than this width to fit properly. For example, a 36" cabinet can fit a 33" sink allowing space for mounting and rim. |
| Base Cabinet Depth | Typically 24" | Usually sufficient for standard sink depth; less critical but should be confirmed. |
| Base Cabinet Height | Usually 36" | Generally not a limiting factor; plumbing adjustments may be needed if sink depth changes. |
| Countertop Hole Size | Matches sink size | Must be cut to fit sink; enlarging holes in existing counters can be difficult depending on material. |
| Cabinet Interior Width | Varies by material thickness | For example, 36" nominal width minus 1.5" (3/4" material each side) equals 34.5" interior space available for sink. Measurement is crucial to avoid fitting issues. |
Always double-check your kitchen sink measurements before you buy. If you want to upgrade to a larger sink, make sure your cabinet and countertop can handle the new size. Careful planning helps you avoid costly mistakes and ensures your new sink fits perfectly.
Tip: Measure twice before you cut or order. Accurate measurements make installing new kitchen sink sizes much easier.
Measuring for a kitchen sink seems simple, but many people make mistakes that lead to costly problems. You can avoid these issues by knowing what to watch for. One common error is measuring only the outside of the old sink instead of the actual cutout or cabinet space. This mistake can cause you to buy a sink that does not fit. Another frequent problem is forgetting to check the depth of the cabinet. If you choose a deep sink without enough space, you may run into plumbing or storage issues.
Some people skip checking faucet compatibility. If you do not measure the spacing of the sink holes, your new faucet might not fit. Overlooking countertop clearance is another error. Always check for obstacles like windows, backsplashes, or cabinets that could interfere with the sink or faucet. Rushing through the process or failing to double-check measurements often leads to installation headaches.
Tip: Always use a tape measure and record every number. Double-check your work before making any cuts or purchases.
Before you buy or install your new kitchen sink, run through this checklist to ensure you have covered every detail. Professional installers recommend these steps to help you achieve accurate kitchen sink measurements and a smooth installation:
Shut off the water supply valves under the sink to prevent leaks or flooding.
Clear the area under and around the sink for easy access.
Inspect the plumbing for leaks or corrosion and fix any issues before starting.
Measure the countertop opening carefully. The sink should be about 3 inches smaller than the base cabinet for a proper fit.
Confirm the type of sink you need, such as drop-in or undermount, to match your kitchen layout.
Use the manufacturer’s template to mark and cut the countertop precisely.
Gather all necessary tools and materials, including a tape measure, wrench, screwdriver, jigsaw, silicone sealant, sink clips, gloves, and safety glasses.
Remove the old sink clips and cut through old caulk with care.
Install the faucet and drain assembly before securing the sink in place.
Apply silicone caulk around the sink edge to create a watertight seal.
Secure the sink with mounting nuts and make sure it sits level and flush with the countertop.
Connect water supply lines carefully, avoiding over-tightening or kinks.
Test the faucet and drain for leaks before finishing the installation.
Checking each item on this list helps you avoid common mistakes and ensures your new sink fits perfectly.
By following these steps, you can feel confident that your measurements and installation will go smoothly. Careful planning and attention to detail make a big difference in the final result.
Measuring for a kitchen sink requires careful planning and attention to detail. Accurate measurements help you avoid leaks, cabinet damage, and costly repairs.
Always measure the cabinet, cutout, and sink dimensions precisely.
Triple-check your numbers and compare them with manufacturer guidelines.
Use the checklist before buying or installing your new sink.
If you feel unsure, consult a professional. Expert advice can prevent installation problems and ensure your new sink fits perfectly in your kitchen.
You can measure from above and below. Use a tape measure to check the length, width, and depth. Shine a flashlight under the sink to see the edges. Write down each number for accuracy.
Most standard kitchen sink cutouts measure about 22 inches by 33 inches. Always check your cabinet and countertop before buying. Manufacturers may have different size recommendations.
You can install a larger sink if your cabinet and countertop allow it. Measure the interior width of your cabinet. The new sink must fit inside without touching the sides. Sometimes, you may need to modify the cabinet.
Yes, you should measure the distance between faucet holes. Some sinks have one, two, or three holes. Check the spacing to match your new faucet and accessories.
Leave at least 2 inches between the back of the sink and the wall or backsplash. This space gives you room to install the faucet and connect water lines.
A tape measure, level, and straight edge work best. For extra accuracy, use a laser measurer or laser level. Always write down your numbers and double-check them.
You need a special cabinet or must modify your existing one for a farmhouse sink. These sinks have an apron front and are deeper than standard sinks. Always check the manufacturer’s instructions.
Use a level to check the countertop. If it is not level, adjust the sink installation or fix the countertop first. A level surface helps prevent leaks and ensures a proper fit.


